Saturday, June 22, 2013

What a week! My blog has been up for 9 days and It has been great so far! And to the lovely people who have started following me, THANK YOU! I was not expecting to have any follower yet, and you proved me wrong! You guys are awesome!

Anyways I haven't posted in a few days, I have been quite busy with summer school (and maybe a few long nights at the hot tub :) ) So to make up for that I will be posting a few cards I have made recently. Here we go!


I loved making this card! So I do not yet have a die cutter, but I had the opportunity to get some unique designer paper from a  local paper store (not the kind of paper you can get at hobby lobby!). I was in HEAVEN when I went, but unfortunately for me (but fortunately for my wallet) the store was back home in Ohio, not in Texas. I found this really great hexagon die cut paper and fell in love with it instantly. I cut out a section for my card and added brads to all the "joints" of the hexagons. I added some tiny pieces of foam adhesives and attached it to the base of my card, added my sentiment, and I was done! 


I know, I know, not this sentiment again, right? I do need to find my sentiments I like, but I just love the typography on these Studio G stamps. Anyways I stamped my sentiment of a piece of white card stock and attached it to some wonderful K&C Company designer paper (On of my favorite paper companies!). I then peeled back the paper to reveal the sentiment. I finnished it off with some white scribbles on the sides. 


Again a fairly simple card for today. For this I used 4 different border stamps and used rainbow inks to create a fun card base. I then stamped the balloon and sentiment border, wrote my sentiment, added the balloon strings, and the dashed border. 

That's it for today lovlies! I hope you enjoyed something from today's post, Let me know what you liked or what you would change in the comments. :D

Happy crafting! 
  

Tuesday, June 18, 2013

Hello Barracuda!

Hello crafty world! How is your Tuesday? So For today's project I took inspiration from A Card a Day's June Just Because Challenge and 365 Cards White Space Challenge. But I have to admit there was a tiny bit more inspiration from an unlikely source.


I Just gave myself a mani pedi using Sally Hanson's Hello Barracuda  (the pale blue) and Sally Hanson Grass Slipper (the green). I Just loved how summer and fun these colors were, especially working together! So I incorporated it in to today's card.  


So I used Two stamp sets from My Mind's Eye called "Sweetest things 'remember' " and "Ginger 'Pictures' Stamp". To create the gradients in the stamp I simply used 3 Ink pads (one green, one blue and one beige) on the stamps and blended them. I really like how this one turned out! It was easy and could definitely be mass produced. I had fun and I hope you enjoy! 

Stay crafty!


Materials:
My Minds Eye: Remember Stamps set
My Minds Eye: Pictures Stamp Set
Studio G: Blue Ink pad and Green Ink pad
Unkown brand: Beige Ink
Versamark Watermark Ink
Super Saver Basic Paper Pack
American Crafts Zing White Embossing Powder
Paper Studio Heat Tool
Vellum 


Contests Entered: 


Sunday, June 16, 2013

Double Dose Sunday

So Today I actually have two cards to show. Both were for 365 Cards Challenge. For my first week blogging, I made it my goal to complete a full week of challenges from 365. It has been a lot of fun, and I was surprised by how challenging it was to make at least one new card/project every day, And let me tell you, my apartment has never been messier.  But none the less here are my last 2 cards for the week!

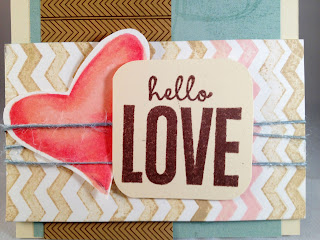
The first Card was for the The shape of my Heart Challenge posted earlier this week. The goal was to make a card featuring an unusual shaped heart. It took me a while to come up with this card but I am happy with the results.


To create the background I used 2 heart stamps and my Versamark pad. For my featured heart, I sketched out a heart and colored it with my Copic markers. A pretty simple card with just enough details. 

Materials:
Me and my Big Ideas- Brown chevron paper 
In my Mind's Eye- Blue Paper
Large gift tag
In my Mind's Eye- Chevron stamp from "All is Bright" set
Studio g - Hello Love
American crafts - Blue Jute 
Memento Ink - Rich Coacoa 
Coffee and Pink inks- Unkown 


The second Challenge was for the Make a Match Challenge over at 365. The guidelines were to make a card with a matching container. If I were to give this to someone, I would fill my jar up with all the dry ingredients for raspberry cupcakes (since that was my inspiration!). Also the sentiment on the card was from two different stamps. One was Hello Love and the other was Sweetie (If any of you watch doctor who, yes that was intentional ;). I wiped all the ink off of the "love" part to just stamp the Hello. This was my first time attempting that technique, and I think it really paid off! Again this was a slightly difficult challenge for me, but I am absolutely in LOVE with the results of this one.


This turned out to be one of my favoirte projects so far! I almost didn't complete this week's challenges, but I am glad I pushed myself! 


Materials:
Super Assortments Craft paper- Light Pink, Medium Pink, Beige, Brown
K&C Company designer paper
American Crafts- White Jute
In my Mind's Eye - "Hanging Out" Stamp Set
In my Mind's Eye- "The Sweetest Thing" Stamp Set
In my Mind's Eye- In my Mind's Eye- Ginger "Pictures" set
Studio G- Hello Love Stamp
Vellum
Distressed Ink- Victorian Velvet
Memento Ink- Rich Coacoa
White Gel Pen


Let me know what you liked/didn't like in the comments down below, I LOVE to hear your guys thoughts!
Stay crafty my friends!


Contests I am entering:
Make A Match
The Shape of my Heart
Spark your Creativity

Friday, June 14, 2013

Dad in Blue

This card was made for another 365 Card Challenge! This one was to create a card in the following color scheme.


Any who I just got a great haul from marshals today. That's right marshals (whoda thunk?). And I got some great new stamps and 3-d letter stickers so I couldn't wait to incorporate them in this design. But before I got started I needed to find a little bit of design inspiration,  And my wallet did just the trick! 


I really loved the lines and the stitching, and its influence really is apparent when you look at the card I came up with. 

 So I did'nt have the exact colors for this project, but I tried to keep it as close as possible to the challenge guidelines. Regardless, I love how it turned out, you really can get inspiration from anywhere! 

Happy crafting everyone! 

Contests entered: 
365 cards: Color Combo
D.L. Art: Thankful Thursday

Spark your Creativity


Let them eat cake!

So I based this entry off of a sketch challenge from 365 Cards. I was actually surprised at how challenging this card was to make! Usually I just free design my cards, but for this challenge I had to follow a specific layout, and I LOVE how it turned out.


To make the gifts and the cake I applied the stamps on different pieces of patterned paper, then I fussy cut them and assembled them. Wasn't to hard of a technique, but the birthday cake did get a bit tricky. 
Anyways, I hope you all enjoy this post, stay crafty! 

Materials used:
Hampton Art Birthday Set
Versamark Onyx Ink Pad
Various Patterned Paper
White Uni ball Pen
Glue Runner
Dimensional adhesives.

Contest I am entering in. 
365 Cards - Sketch it Sunday
Hobby House Anything Goes
Sister Card Challenge- Anything goes
Spark your Creativity


Victorian Velvet Party

So the challenge for this was to create a card using 3 items in my stash that I haven't used before. Although they were fairly recent additions to my supplies (1-3 weeks old) I still hadn't gotten around to playing with
them.The design is fairly simple, but I am really happy with how it turned out.


Replicating this card is fairly easy, The only tip I have for you is in stamping the sentiment. I first inked the stamp all over with a Studio G mini inker, then I inked the sides of the stamp with the Victorian Velvet to create the gradient tonal quality.


 The virgin supplies are:
 Distressed Ink- Victorian Velvet
Tim Holts Adirondack Alcohol Ink Applicator
 Paper Studio Flowers
 Party Just Because wood block stamp.


Other supplies used:

Polka Dot Embossing Plate
Paper Studio Vintage Brads
Paper studio White Paper


Contest I would like to enter: 


Thursday, June 13, 2013

Summer Salutations!

So I have been addicted to coloring with my copics, And if you have a stock pile of flowers like I do (or any die-cut or fussy fut flowers) , than this card is easy to make, and is perfect for the summer time.

This card is pretty straight forward. I started by adhering. some soft, hand made paper to the card base. I love the color of this paper, mixed with the texture. I wish I knew where i had gotten it from, but sadly  it was in the bottom of my scrap bin! But anyways, I then wrapped some American Craft's light pink jute around the base, tying it where I knew I was going to cover it. I then colored one big flower and 3 smaller ones and played with the placement until i achieved a balance. I then attached the flowers with dimensional adhesives, stamped my sentiment -rounded the corners - and attached it with another layer of dimensional adhesives. Then I rounded the corners and voila! All done!
I'm not sure if this needed any instructions, but I am still new to this!

Let me know in the comments below what you like about the card, what you would improve, and if you try something similar I would love to see it as well!

Contest:
Spark your Creativity

365 card: Welcome Summer
Happy crafting :)

Father's Day Card.


This week I decided to make this fun Father's day card for the upcoming holidays. This was actually my 3rd attempt, finally made something I am happy with! My dad is a Leo, so I was super happy when i realized I had this cute lion stamp that I could incorporate. Well since this is my first card post, let me know how I do with my direction and how to make them better! 

 I used White paper studio paper as well as the paper studio embossing plate for the bottom layer. I then lightly rubbed on some Distressed Ink in Antique Linen to add a little bit of color on the dots without staining the page. 

On another sheet of white paper I stamped the image of the lion and balloon in Memento Ink: Tuxedo Black. While the ink dried I grabbed a waxed paper plate and stamped my Antique Linen pad directly on to the plate. I added some water to the side and used that with the Ink to color in the Lion. I then used the same technique with the Distressed Ink: Broken China to colorize the Balloon. I then stamped the Dad banner stamp using Broken china, and fussy cut a matching vellum piece to go on top, then attached it to the back of the lion. 

I then cut a strip of Dilly Dally's wood plank paper from their 6x6 My Mind's eye set and glued a fussy cut velum scalloped strip to the back. I added dimensional adhesives to the back and fixed it to the card base. I then added dimensional adhesives to the lion and the balloon then drew the string in between them and I was done! 
Pretty easy to make and it had a super cute result as well! 
Happy crafting :D 

 
Challenges:
Spark your Creativity


Hello!

So as of right now I am sure that I am talking to myself. But that's okay! If you have managed to stumble across my little crumb on the internet machine here is a little about myself. My name is Sammi, I am a design student at Texas State, with a minor in advertising. I love art and I love to craft, always have ever since I was little. I started stamping when I was about 11 with my mother (we used to go to all the stamp'in up events). Once high school hit, I stopped crafting to focus on activities/being a teenager. But recently I have gotten back into crafting and have fallen in love with it once more. It is a great way to take a break from my school work, while still keeping my mind thinking about design. Anyway, This is my first blog so we will see what happens from here. Whats the worst thing that could happen right?

Hoping to craft with you soon!
Sammi